Harness tabs

harness <name> runs an AI coding harness — claude, opencode, or codex — as a full-tab terminal:
harness claude
harness opencode as quality        custom tab label
harness claude --no-workspace      opt out of the default workspace
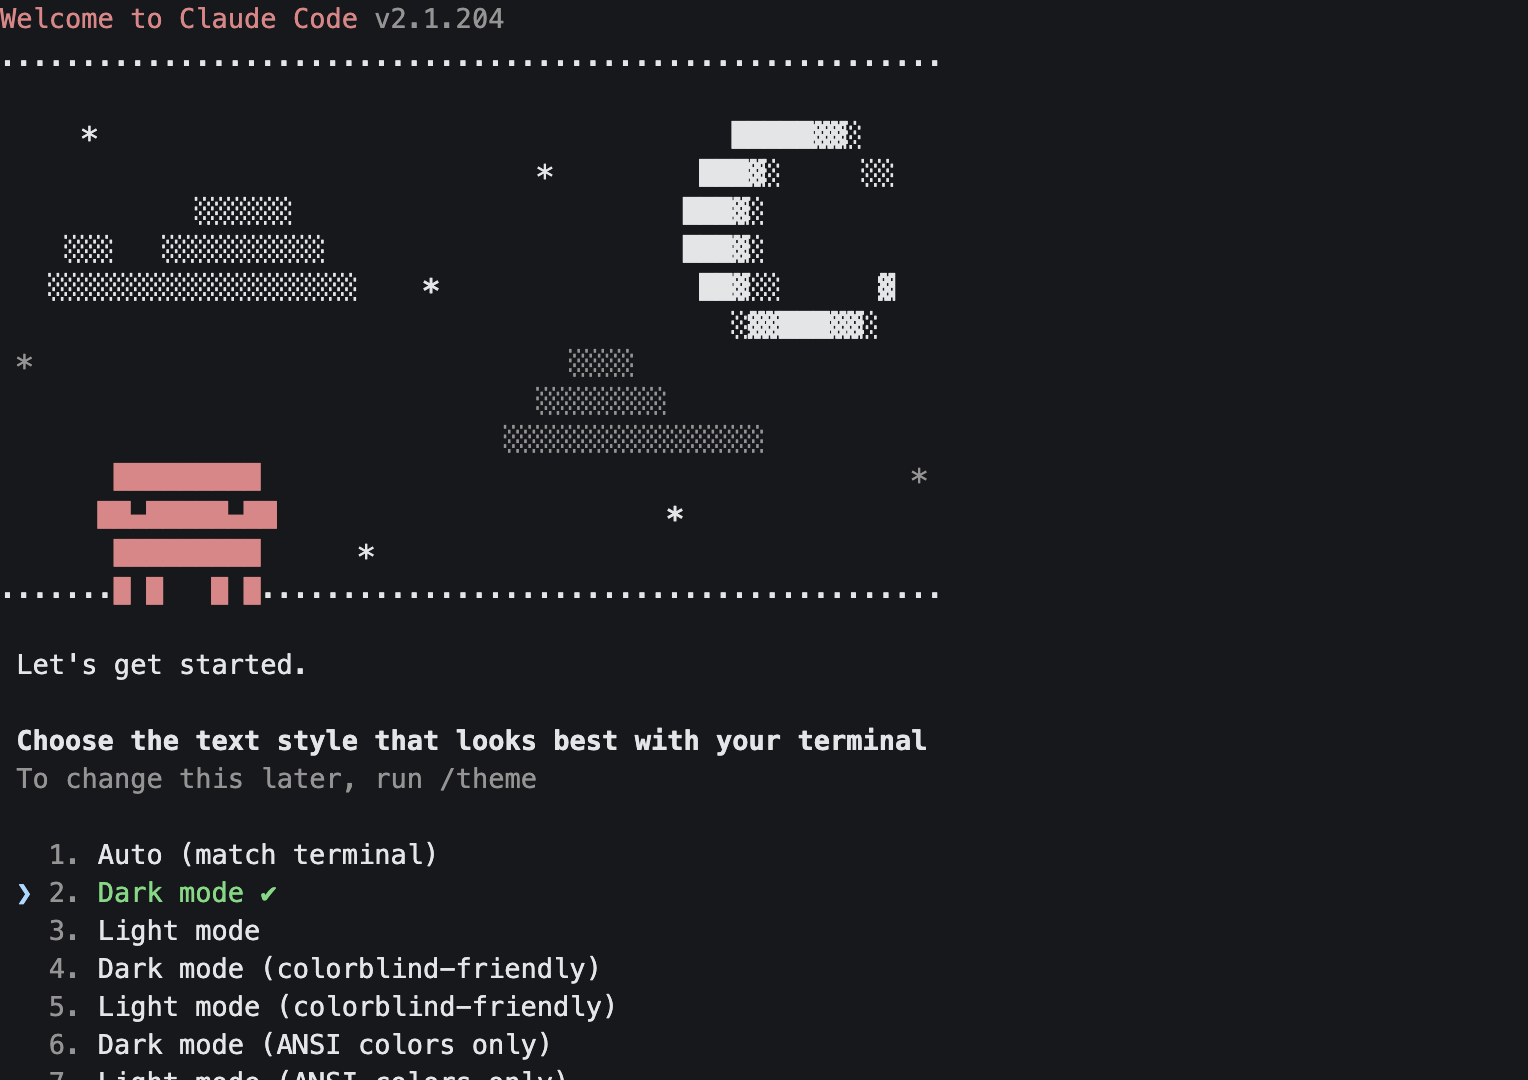
The harness takes over the whole tab: no transcript, no command bar — you're talking straight to the harness's own interface, exactly as you would in a terminal. The binary must be installed and on your PATH; if it isn't, the tab closes as soon as it opens (the launch is still recorded in the tab you ran the command from).
Typing into a harness
Everything you type goes to the harness — including Ctrl+C, Ctrl+D, and Ctrl+R. Two things are held back for the app: Shift+←/Shift+→ still switch tabs, and clicks on the tab strip still work. Switching to a harness tab focuses its terminal automatically, so you can type immediately. Shift+Enter is delivered as a line continuation rather than a submit, which is how you compose multi-line prompts in harnesses like claude.
Tab reordering (Ctrl+←/→) isn't available while a harness has focus — switch to another tab first.
Labels

The tab is labeled with the harness name by default; a second harness claude becomes claude-2, and so on. as <label> picks your own label instead (collisions get the same -2 suffix):
harness opencode as quality        → tab "quality"
harness opencode as quality → tab "quality-2"harnesswith no name opens the New harness dialog in the app (see below). Only the classic terminal UI printsUsage: harness <claude|opencode|codex> [as <label>] [-w].instead.- An unknown name:
Unknown harness "foo". Choose from: claude, opencode, codex. aswith no label:Usage: harness <claude|opencode|codex> as <label>.
New harness dialog
Typing harness with no arguments opens a New harness dialog instead of erroring: a form with a harness selector, a Label field, Workspace and Offline toggles, an Auto-approve toggle, and Model and Effort dropdowns. Workspace starts checked. Auto-approve starts checked for claude and codex and disabled for opencode.
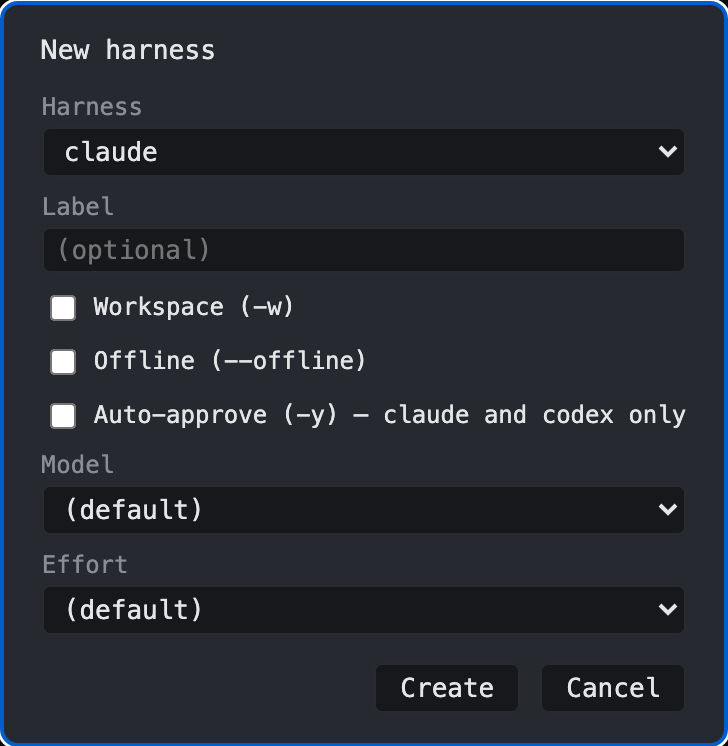
Auto-approve stays disabled unless you've picked claude or codex — the dialog only ever builds a command that's actually valid. Switching between claude and codex keeps your Auto-approve choice; switching to opencode clears and disables it. Create launches the harness right away, the same as typing the equivalent command by hand. Cancel or Escape closes the dialog with nothing launched. Your choices are remembered for the rest of the session, so reopening the dialog restores your last picks and puts focus on Create so Return relaunches immediately.
Choosing a model and effort level
harness <name> [as <label>] [--no-workspace] [--no-auto-approve] [--model <name>] [--effort <level>]--model <name> picks a model, passed to the harness binary's --model flag verbatim. It's checked against that harness's known model catalog first — an unknown model errors with Unknown model "<model>" for harness "<name>" — add it to harness-models.json. and no tab opens. The bundled catalog covers claude, codex, and opencode; the opencode entries carry a provider prefix (opencode/…, opencode-go/…, google/…) because that harness reaches three providers, and the model you name has to match the one whose key you've configured.
The catalog is kept up to date by hand and lists only models you can actually hold a conversation with — embedding, speech, and image models are left out even where the same key would reach them. If a model you want is missing, or you've been given access to one that isn't public yet, the override file below is the way in.
A project can drop its own .janissary/harness-models.json (a JSON object mapping harness name to a list of model ids) into its .janissary/ directory to replace the bundled catalog entirely for that project — useful for pinning a project-specific set of models or covering a harness the bundled catalog doesn't populate. Likewise, a project can drop .janissary/agent-names.json (a JSON array of names) to replace the bundled agent name pool. If either file is missing, the bundled default is used; if it exists but isn't valid JSON, a warning is printed and the bundled default is used instead.
--effort <level> picks an effort/thinking level. There's no catalog to check it against, so any value you give is forwarded as-is — but it's translated to whichever flag the harness actually understands so the launch never breaks: claude gets --effort <level>, codex gets the reasoning-effort config override -c model_reasoning_effort=<level>, and opencode (which has no effort flag) simply ignores it:
harness codex --model gpt-5 --effort high
harness claude --effort high
--model and --effort can be combined with each other and with as <label>, -w, and -y in any order.
Whichever of --model and --effort you set show up as small chips in the harness tab's metadata row, next to the working directory — see the tab metadata row. A launch with neither flag shows no chips.
Workspaces
Harnesses start inside a disposable clone by default — the same isolation agents get. -w/--workspace explicitly confirms the default, and --no-workspace opts out. See Workspaced agents for how the clone, sandboxing, and GitHub authentication work.
Auto-approving permission prompts
Claude and codex harnesses auto-approve permission prompts by default. -y/--yes explicitly confirms the default; --no-auto-approve opts out. When active, the app answers a harness permission prompt automatically instead of waiting for you, and records an Auto-approved a permission prompt notification with a link to what was approved. For codex, the app recognizes its approval overlay and confirms the highlighted one-time approval choice — never a persistent "always allow" option. Opencode remains unsupported:
harness opencode -y(or any harness without a recognized permission prompt):-y/--yes is only supported for the claude and codex harnesses.
Auto-approval doesn't require a workspace. Launching with --no-workspace still works, but unless you also pass --no-auto-approve, the new tab's terminal shows a security warning that prompts will be approved unattended against your real files.
A harness with auto-approval active shows the auto-permitting flag icon in its metadata row.
Knowing when a harness needs you
A harness tab's blinking dot follows what the harness is doing, not just whether its process is alive: it blinks while the harness is generating or running tools, and settles once the harness is back at its own prompt. That works from the strip, so you can start something and go elsewhere without checking back.
A new harness tab starts busy until the app has had a look at it. Going idle takes two readings in a row before the dot settles, so a pause mid-answer doesn't make it flicker; going busy again is immediate. Either way the strip updates live, whether or not you're on the tab.
When a harness that isn't on screen finishes and goes idle, its tab picks up the unread flag — that's what tells you to come back. A tab you're already looking at doesn't get flagged, since you can see it. One exception: for claude, a turn that ends with nothing but a recap: summary line is left unflagged. The dot still settles; a recap on its own isn't news.
A permission prompt is treated as idle, because the harness is waiting on you rather than working. If nothing is going to answer it — you launched without -y, or auto-approval hit a prompt it couldn't clear — the tab is flagged straight away instead of waiting out the usual two readings. Opencode is the exception again: its prompts aren't recognized as prompts, so a stuck opencode tab is still flagged, just on the ordinary timing.
See Tabs for what the dot and the flag mean everywhere else.
Starting with a prompt
A trailing with <prompt> clause gives the new harness something to do as soon as it's ready, so the launch and its first instruction happen in one command:
harness claude with fix the failing testsEverything after the standalone with keyword is the prompt, taken verbatim — so words that look like flags or as inside it are treated as prompt text, not parsed as options. with must come after every other option.
harness claude with(nothing afterwith):Usage: harness <claude|opencode|codex> [options] with <prompt>.
Wrapping the whole launch in a schedule command runs it — fresh harness plus prompt — at a future time: schedule deploy at 5pm harness claude with fix the failing tests.
Lifecycle

The tab lives exactly as long as the harness process. When the harness exits — quitting normally, crashing, or the binary not being found — the tab closes with it, and its on-screen scrollback goes with it. The full session is preserved in a recording file and a normalized session transcript, though (see below). The × button and close end it the same way. Harness tabs aren't restored by janus --relaunch; each launch starts fresh. If a harness tab is the last tab standing, its exit quits the app.
Other tabs can drive a harness: send <tab> <text> types a line into it, and scheduled commands targeted at a harness tab are typed into it the same way. A harness launched by a profile can also be given a model, an effort level, and startup commands, the same as typing the command directly.
Recordings
Every harness session is recorded automatically — there's no command to start it. The full session, with its timing and colors, is written to a .cast file under .janissary/recordings/ in your project, named <label>-<timestamp>.cast. Because the whole stream is saved, you can review a session even after its tab has closed and its scrollback is gone. Only the harness's output is recorded. Nothing you type is ever written to the file.
Closing the harness tab or quitting the app closes the recording cleanly before the process ends.
The file is created only once the harness produces its first output, so a harness that exits immediately (for example, a binary that isn't found) leaves no recording behind.
Replay a recording with asciinema:
asciinema play .janissary/recordings/claude-2026-07-10T18-30-05-123Z.castThe files are standard asciicast v2, so they also drop into any asciicast web player. Recordings from the current run are cleared the next time you start janus normally; a janus --relaunch keeps them. SSH sessions are recorded the same way and land in the same directory (see SSH sessions below).
Capturing a harness's screen
harness capture <name>Writes the harness tab labeled <name>'s current screen to a file and opens it in an editor tab — a one-off snapshot, unlike the continuous session recording above. <name> is the tab's label, not a harness type, matched exactly and case-sensitively.
harness capturewith no name:Usage: harness capture <name>.- No tab has that label:
No tab labeled "<name>". - The tab isn't a harness tab:
"<name>" is not a harness tab. - The tab is a harness tab but nothing has been captured yet:
No capture available for "<name>" yet.
Opening a session transcript
harness transcript <name>This opens the named harness tab's normalized session history in a regular editor tab. <name> is the existing tab label, matched exactly and case-sensitively. The transcript includes the harness's subagent prompts, tool calls, and results, even when the terminal shows only a collapsed progress line. The editor shows the file as it exists when you open it, so run the command again after more activity to open a newer point-in-time view.
The transcript file is created lazily at .janissary/harness-transcripts/<label>-<timestamp>.txt when the first transcript entry arrives. A harness that produces no transcript leaves no empty file. Closing the harness tab or quitting the app stops transcript updates and closes the file cleanly. The directory is cleared on a fresh launch and preserved by janus --relaunch. SSH tabs never have a session transcript.
harness transcriptwith no name:Usage: harness transcript <name>.- No tab has that label:
No tab labeled "<name>". - The tab is not a harness tab:
"<name>" is not a harness tab. - No transcript is available yet:
No transcript available for "<name>" yet.
Watching a harness with a monitor
You can point a monitor at a harness tab — monitor <persona> <harness-label> — to have a persona watch the harness's session history and current screen. The monitor receives transcript history before the latest screen, so it gets both what the harness has done and its current interactive state. SSH tabs can be watched the same way for screen output only. See Monitoring with personas for the full picture.
SSH sessions
ssh <destination> opens the same kind of full-tab terminal running a real ssh session:
ssh devbox
ssh -p 2222 admin@host
Everything after ssh is passed to the real ssh binary verbatim — flags, user@host, jump hosts, a trailing remote command. The tab is labeled with the bare host name (admin@10.0.0.5 → 10.0.0.5), the session appears in the connections panel as ssh:<destination>, and connection close ssh:<name> ends it from any tab. Input, focus, lifecycle, and send/schedule delivery all behave exactly as for a harness tab. There's no as or -w here — anything after the destination belongs to ssh itself.
An ssh:// prefix is removed from the destination used in the connections panel. The tab label also removes a leading user@ and a trailing :port. If two SSH tabs would have the same label, the later tabs use -2, -3, and so on. The connections panel stays visible while an SSH tab is active. connection close ssh:<id> matches the tab's unique label before its destination, so two tabs connected to devbox can be closed separately. If nothing matches, the command reports No open connection ssh:<id>. See Connections for the global SSH rows.
sshwith no destination:Usage: ssh <destination> [ssh options].
Before the tab opens, the ssh <destination> […] command itself is recorded in the transcript of the tab you ran it from. That happens first, so the launch stays visible even if the connection fails immediately — an unreachable host or a rejected login closes the new tab right away, and its error output goes with it rather than echoing back to the tab you launched from.
Recording an SSH session
Every SSH session is recorded automatically, exactly like a harness session, to a .cast file under .janissary/recordings/ named after the tab label. Only what the remote host printed is saved — nothing you type is ever written, so a passphrase or a remote sudo password never lands on disk. The recording's header carries the full invocation you typed, so a stray file still names the host it came from. Two sessions to the same destination get separate files, matching their devbox / devbox-2 labels.
That error output a failed connection takes with it does reach the recording: ssh prints it before exiting, so it's captured before the tab closes.
Replay it the same way as any other recording:
asciinema play .janissary/recordings/devbox-2026-07-10T18-30-05-123Z.castIf the recording can't be written — an unwritable .janissary/recordings/, say — the SSH session itself carries on unaffected, and a single ssh recording failed line appears in the notifications tab for that session.
The ssh tab closes as soon as the ssh process exits, whether that's a normal logout, a dropped connection, or an immediate failure. Closing the last remaining tab quits the app, same as any other tab.
Typing ssh <host> after shell (shell ssh <host>) doesn't open a dedicated tab — it opens an inline terminal card in the current tab's transcript instead, the same as any other interactive program run through shell. Only a bare ssh … command opens its own tab.
SSH tabs are in-memory only. They are not restored by janus --relaunch, so each launch starts a new session.